Thursday, August 6, 2015

Carey Top from Itch to Stitch

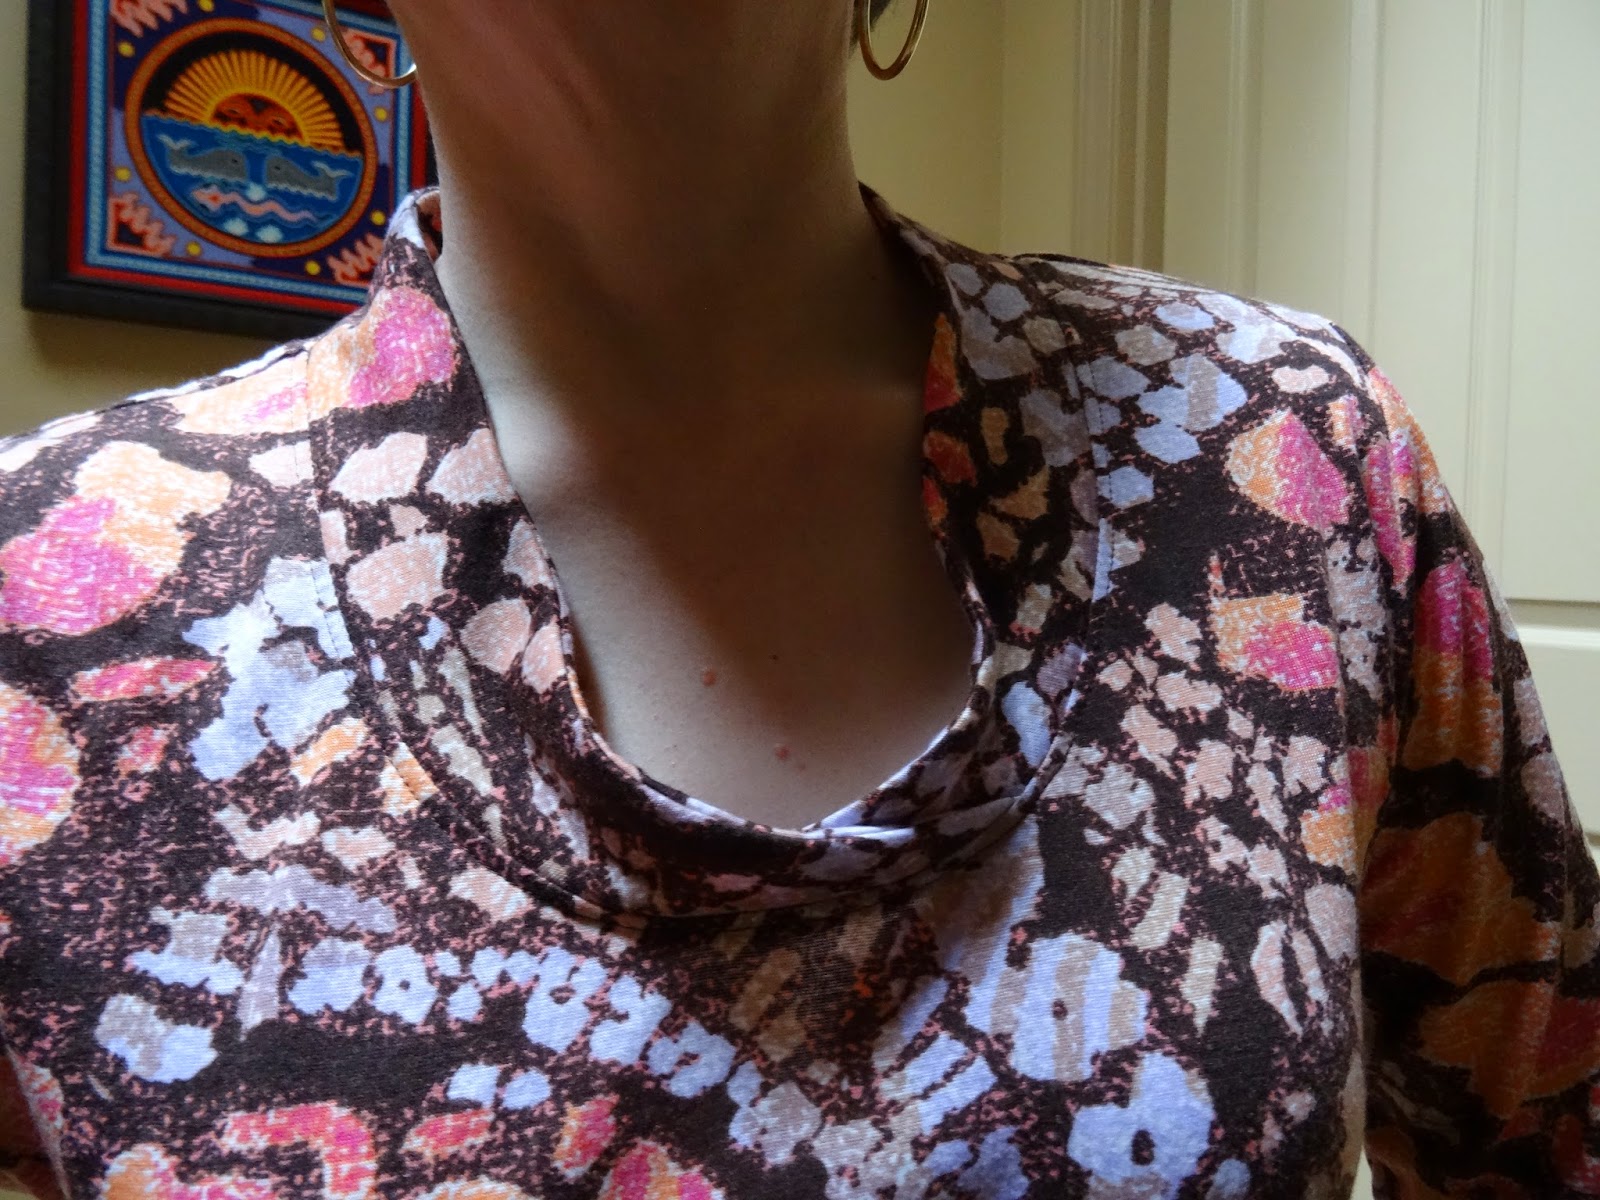
Introducing the Carey Top from Itch to Stitch!  Today is the release date for the pattern and I am finally able to share my version with you.  The talented Kennis Wong has designed a new pattern with a relaxed vibe that is an excellent transitional piece in anyone's wardrobe.  The top is designed to be soft and flowing and the fabric recommendations reflect this:  lightweight, drapey fabrics like lightweight silks, voiles, and other soft wovens and knits too!


I was a tester for this pattern.  As a tester, I received the pattern for free to test it.  I received no other compensation and my opinions on the pattern are my own.  I thoroughly enjoyed testing this pattern and found it well drafted and easy to sew.  The only fiddly bits are the ties for the sleeves and the bias binding for the neckline.  The top is an easy make for an experienced sewist and achievable for an ambitious and patient beginner.

My top was made from a Liberty Tana Lawn that I purchased at Liberty of London in 2014 when we were in London.  The print is Ianthe in a colorway they no longer have available.  I was unable to find this particular fabric at any other on line fabric store here in the US.

I was careful to make sure the pattern ran in the same direction on the front and the back.  I cut the contrasting panels on the sleeves running the length of the fabric.


I made a straight size 6 based solely on my measurements.  I did measure the finished size of the garment to ensure that I would not be drowning in it.  What I found is that finished measurement of 42" for a 36" bust was right in line with a similar RTW top that I own.  The top is supposed to be roomy and flowing without being a sack and I believe that goal has been achieved.


Here you can see the tie detail more clearly.  It is a nice, pretty touch without being too fussy.  I really like this pattern and will make it again.  I already have the next version in mind.  I have a very lightweight jersey in a stripe pattern in 2 colorways that I bought on sale at JoAnn Fabrics from the remnant table.  I am going to use the mainly white fabric for the body and use the purple for the insets and possibly a contrasting neckband.


I like this top for casual wear -- it will be perfect for the upcoming transition from the very hot summer we had this year in the Seattle area and the cooler fall.  In a typical year, this is the sort of top that we in the temperate Pacific Northwest can wear most of the year.  Some of the other ladies who tested the top made it from knits or silkier fabrics.  Some used contrast insets or lace insets and it completely changes the look and feel of the top.  Pop on over to Kennis Wong's web site Itch to Stitch to take a look at the other versions.  The pattern is available today and there are other pretty patterns to choose from as well.


Sunday, January 4, 2015

New Year, What is ahead?


I am ready to move into 2015.  I did not make resolutions about sewing or otherwise.  I never have.  They somehow have always seemed artificial to me.

I do have plans, however.  I always do.  I have several new fabrics to make new button down shirts.  I have another quilt in mind.  I have the pattern and need to purchase materials for it.

I have seen quite a few bloggers commenting on their need to quit making clothes they do not wear.  I am happy to say, that is one problem I seem to completely lack.  I lead a casual, low-key lifestyle.  I am retired and have no need for a business wardrobe.  I have a few nice separates and dresses for the occasional event where a bit of polish is preferable.  Most of my wardrobe is casual separates.  Those are what I make, in fabrics that are easy care.  And that is what I will continue to make.

Best wishes for a Happy New Year!  May all your sewing plans and time yield beautiful results.

Tuesday, December 2, 2014

Finished Quilt

I finished our quilt!


I am more than happy with the finished quilt.  I am tickled pink that it turned out so beautifully.  I was surprised that it was easier than I anticipated to quilt the whole huge thing with my regular sewing machine.  I credit the Craftsy class Quilting Big Projects on a Small Machine by Ann Peterson for giving me the information and nerve to go ahead and give it a go.

The pattern is the Frame Up Quilt from the book Modern Mix by Jessica Levitt.  I chose the pattern because all of the seams were straight, the lines of the quilt were more modern and the size of the finished quilt matched our bed.  I will admit that wrestling the quilt into proper position for quilting took some doing and required some arm strength.  It was also a bit tiring.  I could do a few blocks at a time and then I would leave and come back to do a few more the next day.  But the results were absolutely worth it!!!!!

I also made larger versions of the blocks to create matching pillow shams for the bed.

This shot gives you an idea of just how large the quilt wound up being.  We have a queen size sleigh bed and I always hated how purchased comforters or quilts left the box spring exposed.  This quilt covers not only the mattress but the box spring as well leaving just a bit of the rails exposed on each side. 

The quilt was done in batiks with 3 shades each of green, orange and brown.  My husband and I chose the fabrics together at our local quilt shop.  We both wanted to have rich, saturated colors on a neutral background.  You can also see the quilting on these close ups of the blocks.


This was the final touch our bedroom needed after painting it a year ago.  We love it! 


Friday, March 14, 2014

Something Different

Quilts.  I have seen so many beautiful ones all made by someone other than me.  Well, that is about to change. I am starting my first quilt!


Not content to sneak up on the idea of a quilt and make something small and easily accomplished in a few hours, I am starting off my adventures on quilting by making a queen size quilt for our bedroom.  Because we like cleaner lines and a more modern aesthetic, I chose a quilt from the book "Modern Mix: 16 Sewing Projects that Combine Designer Prints & Solid Fabrics, 7 Quilts + Pillows, Bags & More",  (Amazon Link:  http://www.amazon.com/Modern-Mix-Projects-Combine-Designer-ebook/dp/B0083JKBUO/ref=sr_1_86?s=books&ie=UTF8&qid=1394834437&sr=1-86&keywords=modern+quilting+books).

I chose the design called __________________.  Instead of Pink, Brown and Orange fabrics, we went with Green, Brown, and Orange since the walls in our bedroom are sage green.  My husband went with me to pick up the fabrics since we both really wanted the quilt to be special and something we both like.  We chose a mixture of various batiks and a beige background which has a parchment mottling.  I also picked up extra fabric of the darkest green for some sashing and to make new pillow cases.

I worked very diligently and have the entire top pieced.  Next comes the quilting.

Wish me luck!


Another Pretty Tee

I made this tee out oa very light weight cotton jersey I bought from Fabric.com.  I used Katherine Tilton Vogue Pattern, Vogue 8793.

Instead of color blocking I used the patterned fabric for all pieces.  I thought about using the double collars, but when I had them pinned in place, it looked to bulky for the light weight fabric and too busy in the print.

I used my serger for all the seams and my cover stitch machine for the hems.  An easy, quick, and satisfying make -- it took less than an hour to sew.

I made the small and it fits great.  It appears as though the weather here in Washington state is cooperating and it will soon be warm enough to wear this out and about without a sweater over it.


Wednesday, February 12, 2014

New top!

It is certainly time to start thinking about new tops for spring and summer.  Even if the temperatures and rain say winter, it is good to start thinking of sun and warmer, kinder weather.  I love light weight knit tops that are more interesting than the basic tee.  Pretty prints, nice silhouettes and interesting details are more my style than a basic, solid colored t-shirt.

I selected Simplicity 1716 view F for my first new top.  I really like the fit of Simplicity knit tops.  They seem to really suit my figure.  I especially like the fact that the shoulders and neck are small enough not to gape.  I used a very light weight cotton/spandex blend jersey that I purchased from Mood Fabrics last year some time.  They do not have any left in stock.

Here are some pictures of the finished top:

First on Lynntu,  I love the draped front.


The side seams are gathered using stretched elastic sewn to the side seam allowances.


I had enough material left that I made an infinity scarf out of the remnant.


And doubled around the neck.  Not sure I would ever wear the scarf with the matching top, but it is interesting how well the scarf sort of blends into drape of the cowl neck.


Now on me!  I did the usual adjustments I have to make.  I took 1" out of the length at the waist since I am both short and short-waisted.  That is usually enough to make the top hit at a flattering place on me and that was the case with this top.  I also, as usual, had to cut the sleeves off by 3" to make them short enough.  It is hard to see it on this patterned fabric, but I used my cover stitch machine to do the hems on both the sleeves and the body of the top.  I serged all the other seams.  I only needed my regular machine to add the elastic at the side seams.  I used clear elastic to both stabilize the shoulder seams and to gather the side seams.


Back view. 

And another closer view of the front:

I really like how this top fits and it is very airy and breezy and easy to wear.  I like the other views on this pattern as well and I can see making more garments from this pattern.

Tuesday, January 28, 2014

A Nice Winter Coat!

I have lots of warm, weather proof jackets.  Waterproof parka, full length waterproof coat, all very utilitarian.  None of them are particularly dress or dress up friendly.  I looked at RTW and was uninspired.  I always have two problems, the fact that I am short altogether and the fact that my arms are of T. Rex proportions.  And I HATE sleeves that drape over my hands.  They make me feel awkward and somehow child like.  So, I scrapped the idea of instant gratification and embarked upon making my own coat.

I purchased the 100% Italian wool from Pacific Fabrics in Bellevue, WA.  It is a warm beige tweed with Forest green, deep red and other colored threads woven in.  It is soft and lush and just what I wanted:  neutral without being black (which makes me look very pale like a denizen of a Twilight movie) and without being boring.


I chose a very feminine coat style with princess seams and a wide skirt, McCalls 6800 Misses'/Miss Petite Lined Coats, Belt and Detachable Collar and Hood.  I liked the longer View A with the wide lapels, but did not care for the mullet hem.  This seemed like a very trendy style feature to me and I did not want a coat, made out of fine wool, to appear completely dated in only one or two years.  So I simply lengthened the front pieces to match the back, creating a knee length coat all around.

I used a weft insertion interfacing to fully interface the front pieces on the coat.  I also used it to interface the front facings.  I made a back stay out of sturdy cotton.  I started to add shoulder pads during the construction, but when I tried on the coat, it was too much.  I have very wide muscular shoulders, the pads made me look like I was trying to revive the 1980s!  I lined the coat with matching bemberg rayon lining.

Here is the finished result!


First on Lyntu, the hem is actually the same all around,  The folds make it look shorter in the front, but it is not.


A better look at the wide lapel.


On me!  OK, here is something new for this blog.  My sweet husband bought me a new camera for my birthday last October.  It is a Sony Cyber-Shot DSC-HX50.  It is still a point and shoot but only just a smidge removed from a DSLR.  One of it's great features is that you can use your smart phone as a remote!  You connect the two via bluetooth and then you can see the picture on the screen of your phone and use the phone to activate the shutter.  So, I am not obsessed with my phone and unable to put it down even for these pictures, it is my picture remote!


Back view


Lovely wide skirt.


I am really happy with how this coat turned out!

Thursday, November 28, 2013

Happy Thanksgiving!

Ready for our guests to arrive.

Happy Thanksgiving to one and all.  I hope you all have much to be thankful for:  friends, family, a happy home and love.  I know I am blessed with each of these.

Wednesday, September 25, 2013

Why so angry?

Why in the world are fashion models so angry these days?  Everywhere I look I see scowling, grimacing women wearing high fashion.

Even the pattern companies have gotten into the act.  Vogue Patterns in particular has models in poses that look like fisticuffs are going to break out any minute!

What is up with this trend?

Monday, August 12, 2013

It Has Been Awhile

I haven't written a new post in some time.  We have been very busy here.  We went to Yellowstone Park for vacation this year and it was amazing!  I had never been and it was such a beautiful and unique experience.

And, what is not to like about a place where this guy lives?


I then enjoyed a cross country trip with my sister-in-law.  She was moving from Arizona to Wisconsin.  I flew down to help her drive to her new home. We went through New Mexico, the panhandle of Texas, through Oklahoma and Missouri on our way to Milwaukee.  Whew!  What a drive!  But is was both interesting and fun to watch the scenery pass by and slowly change going from one state to another.

Well, back home and back to sewing.  I have been contemplating early fall.  I know that in a lot of places in the country, this would be premature in the middle of August.  For some folks, this is the time when summer really heats up.  Here in the Pacific Northwest, August is a reminder that the beautiful weather does not last forever.  We are having an extremely beautiful summer with clear sunny days with a light breeze and high temperatures in the upper 70s and low 80s.  When summer arrives in the Seattle area, it is astoundingly lovely.

But, the reality is that we enjoy such loveliness for only about 2 to 3 months of the year.  But the end of September, we will be looking at a slow cooling down and shorter days.  I was thinking of that part of the season and made a few tops to wear as the weather cools but is still not cold.

First up, New Look 6807, an easy 2 hour top.  I love the softness and 3/4 length sleeves.  I made it out of a geometric print ITY knit.  I made the size 10 for the upper shoulder area and neckline.  I widened out to the 14 to accommodate my bust and then tapered back down to a 10 for the hip.  This is a pretty common way for me to cut a simple tee shirt pattern to get the best fit.  Additionally, I take 1 inch out of the bodice length above the waistline to better fit my short torso.  I also shortened the top by 1.5 inches.  Really, I am only 5 feet tall, so length adjustments are usually the most important for me.


 I think the gathers in the center front are pretty and feminine.
 I chose to leave the elastic out of the sleeves to have them bell shaped and drapey rather than puffed.
 And, I especially liked the center back tie closure.  How cute!
I used my sergerr to sew all the seams.  I stabilized the shoulder seams with clear elastic that I sewed over as I sewed the seams.  I used my cover stitch machine to finish the hem.  This was a super easy make just as the pattern says it is.

Looking forward to wearing this as the temperatures cool here in the Northwest.

I will be back soon with another late summer, early fall make that is almost finished.

Lynn

Wednesday, May 8, 2013

My Madewell Shirt is Done!


And not just one shirt, but two.  In my last post, I was looking at a color blocked shirt from Madewell but did not like the color combination they chose for the shirt.

It was mint green, pale blue and pink.  I just do not like the mint green color and frankly don't look good in it.  So, I decided to change the green to a pale sunny yellow.  I selected 3 colors of 100% cotton pinpoint oxford cloth from Fabric.com.k  I chose the colors sky (blue), yellow and pink.  While I was looking at the oxford cloth, I also bought some black and white 100% cotton gingham to make a second shirt.

I selected a classic shirt pattern by Laura Ashley from McCall's to make both shirts, McCalls M6649.
M6649
The pattern showed one view color blocked but using 4 colors instead of the 3 I had in mind so I used the Madewell picture to decide which color to use for each part of the shirt.

Since this was a new pattern, I had to take careful measurements and make appropriate adjustments.  I took 2 inches off the sleeve length (short little T. Rex arms) and one inch from the torso length to waist (shortwaisted too).  I cut a size 12 for the shoulders and arm holes, collar and sleeves.  I cut a 14 at the bust and waist and then tapered from the waist down to a size 8 for the hips.

Since I was going to use the same pattern for both shirts, I cut and sewed them at the same time.  I used white thread to sew both shirts so it was easy to just do one particular step on both shirts as I sewed.   The most complicated part for each shirt was cutting.  I had to make double sure that I had a left and right of everything on the color block shirt.  And, I decided to cut the yoke, front band and collar stand on the gingham blouse on the bias.

Sewing was simple and straight forward.  At this point, I have made so many shirts in my sewing life that I really didn't refer to the directions at all.  What was interesting is that there was a marked difference in the texture and sew-ability between the fabrics that I probably would not have noticed if I had sewed them separately.  The gingham was much more malleable and easier to ease and stitch.

And the results?  Here they are!


 Gingham Version

I love the buttons on this one.  They were retrieved from a dress that I made for myself many, many years ago.  I wore the dress out and salvaged the buttons before getting rid of the dress.  They have an interesting triangular shape.  Also, you can see the bias cut button band.


I really like the way the bias cut yoke feels when you wear the shirt.  It gives that little extra stretch which really feels good since I have broad, muscular shoulders.


The collar stand was also cut on the bias.  That was interesting -- it was quite the feat to prevent it from becoming misshapen and stretched when I fused the interfacing to it and when I stitched down the inner collar stand after installing it on the shirt!

On me!  Wow, that is a wonky tilted picture.  Not the best photography, but I think you can still see how the shirt fits.


Madewell Version

Here you can see where I switched out the mint green for the sunny yellow.  I like this combination much better.


These button are vintage.  They were part of my mother's sewing stash when she passed away.  I am not sure how old they are but they definitely have a 1950's vibe.  They are the same pale yellow was the pinpoint oxford which I love.


 On this version, I made 2 buttons on the cuffs instead of the one called for on the pattern.


 Me again, in an equally unflattering picture.  I am going to have to start asking my husband for help with these or teach the dog how to snap photos!