Friday, January 25, 2013
Sewing Room
I have made some big improvements to the area where I sew since we moved into our house 3 years ago. It was a a light, creamy yellow with white trim and rather sad looking when we moved in. We recently remodeled our baths and during that upheaval we decided to paint that room as well -- what possible difference could a little more mess and moving stuff around make once you've already ripped the bathrooms apart down to the studs? And, we put in a new closet organizer and bought me some higher quality storage pieces. Once I have a chance to neaten the place up, I will take and post some pictures of my pretty new space!
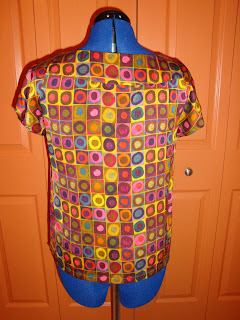
Another Silk Top
This top is made from another of the silk pieces I picked up in London in 2011. This one caught my husband's eye because he liked the colors and the geometric print. Great eye! I loved it too. Again since it was expensive, I bought 1 1/2 meters to make a short sleeve top. I chose to make Butterick 5610 view A. I made a size 12 without alteration. I wanted the top a little longer so I tuck it in or wear a belt with it.
Back view
Front view
Front view with belt
A little closer front view with belt.
It is funny how the shirt coordinates so well with the doors in my sewing room! I guess I really like that warm orangey color!
Wednesday, January 16, 2013
The Silk Blouse Finished!
This is the blouse I made from one of the pieces of silk fabric I bought while visiting London in 2011. I only bought 1.5 meters so I made a short sleeved blouse.
I chose to make View A of New Look 6009. The fabric was easily enough for the view and size chosen. I cut the size 10 with no changes to the pattern.
The major problem with sewing this fabric was that it was SLIPPERY! Very SLIPPERY. I was able to do the sewing by pinning, but I had to be very vigilant that the layers were not going their separate ways during seaming.
I finished the seams using my serger with a 2-thread overlock stitch. I thought the 2-thread option was the lightest finish and didn't distort or make the seam edges feel bulky compared to the lightness of the fabric. As you can see, the gathers at the waste are created by a casing created with bias tape.
Back view of the blouse:
I chose to make View A of New Look 6009. The fabric was easily enough for the view and size chosen. I cut the size 10 with no changes to the pattern.
The major problem with sewing this fabric was that it was SLIPPERY! Very SLIPPERY. I was able to do the sewing by pinning, but I had to be very vigilant that the layers were not going their separate ways during seaming.
This is a picture of my finished blouse on my dress form which I have affectionately named Lyntu.
Up close view of the "knotted" neck. The knot is actually a slit in the center front seam that is then gathered and arranged artfully with the upper neckline and finished off with a small tube of fabric making it look like a knotted front.
I finished the seams using my serger with a 2-thread overlock stitch. I thought the 2-thread option was the lightest finish and didn't distort or make the seam edges feel bulky compared to the lightness of the fabric. As you can see, the gathers at the waste are created by a casing created with bias tape.
Back view of the blouse:
I had one pretty natural shell button that glistened gray, pink and blue that made the perfect finish for the back neck of the blouse.
All-in-all this was an easy pattern to cut and sew. The only real challenge offered was from the material.
I look forward to wearing this soon. I am hoping to take it on our trip to Las Vegas next month, weather permitting.
Thursday, January 10, 2013
A whole year without a post?
I am embarrassed that a whole year has gone by without a single post for I assure you, a whole year did not pass without sewing, knitting and crafting! I have enjoyed the posts of other blogger San d find their successes, enthusiasm and even their mistakes inspirational and educational.
Time for me to get back on board and let you all see what I make instead of just skulking and peeking at the work of others!
Time for me to get back on board and let you all see what I make instead of just skulking and peeking at the work of others!
Subscribe to:
Posts (Atom)


